Microgreen mold growth is tricky to combat, given the wide range of environmental conditions that fungal species can thrive in.
Microgreens are some of the most profitable, flavorful, and healthy plants that home gardeners can grow, even in small spaces like apartments and storage units. Although they are considered one of the best plant types to grow for food, they are not impervious to typical gardening woes such as mold growth. Since they’re often grown indoors, they can be more inclined to fall victim to fungal infections.
Fungal species groups to watch out for include Botrytis, Sclerotinia, Rhizoctonia, Fusarium, and Pythium. Combat and prevent these infections by properly ventilating the growing space, avoiding the reuse of soil, cleaning gardening tools between uses, and sanitizing trays and planters before use. Soil can also be treated with heat before planting.
You might think you’ve gotten a handle on the outbreak one day, just to come back and see the fungus taking over your microgreens the next day. With this guide, you’ll be prepared to take on any fungal infection, regardless of how established it’s become. Read on to learn how to care for your microgreens like an expert.
What Does Mold Look Like on Microgreens?
Knowing how to spot mold growth on your microgreens is half the battle when you’re learning to protect and care for your plants. It’s crucial to understand that mold does not only affect adult plants but causes harm to seeds and brand-new sprouts as well.
For mold infections affecting seeds, it’s easy to confuse the growth with delicate, feathery roots. With adult plants, the growth may be quite distinct in appearance.
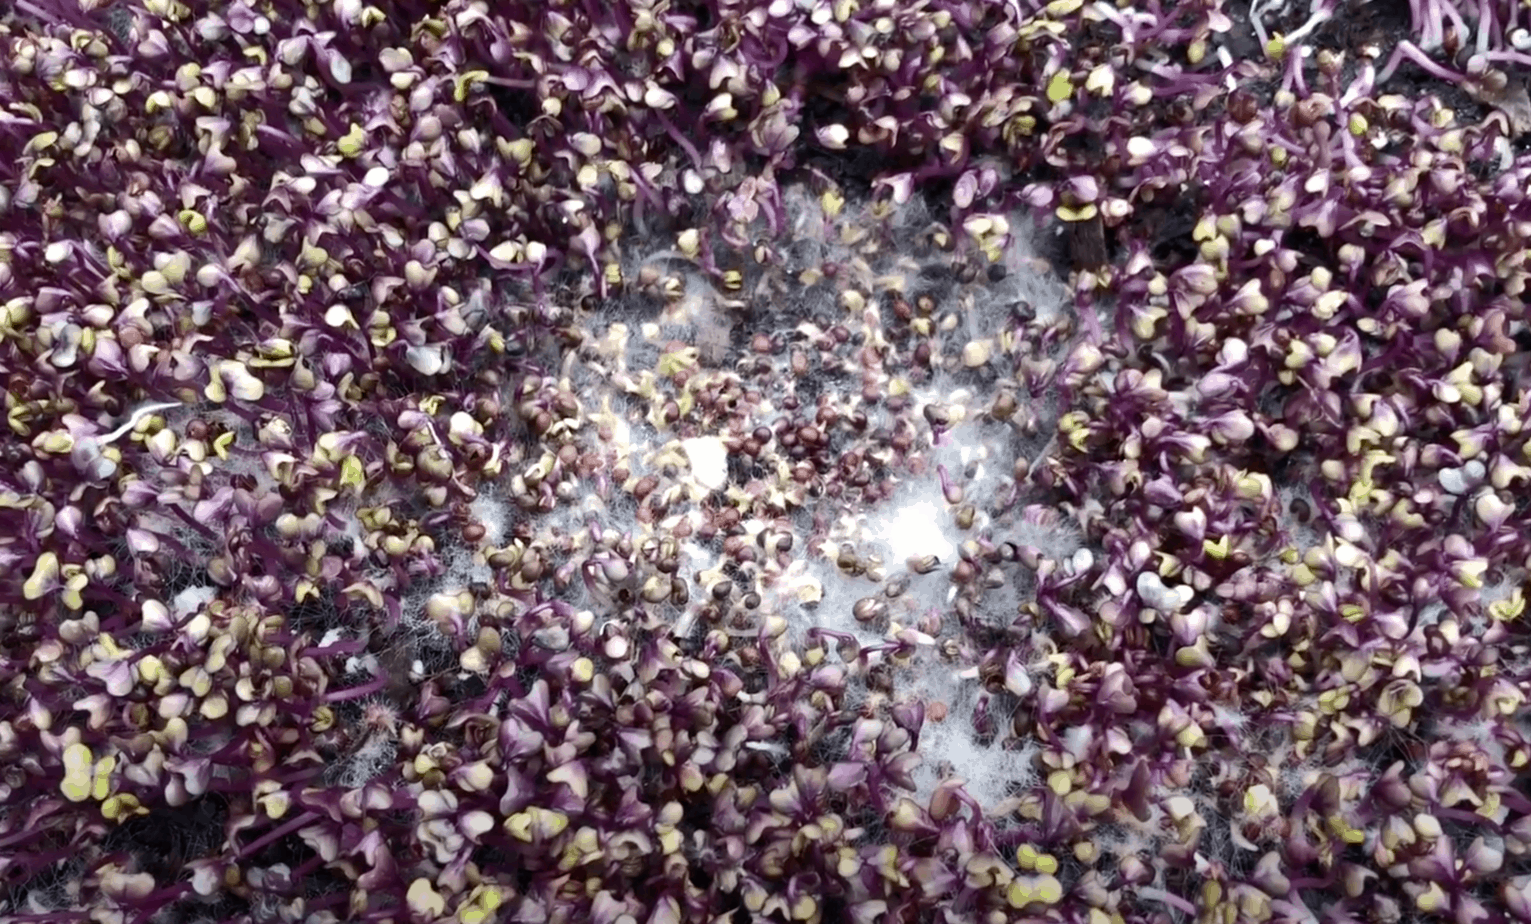
To ensure you are not mistaken, compare your plant’s appearance with the details below to determine whether your microgreens have been afflicted by mold (Source: lowimpact.org):
- Thin white fibers that are arranged in a sort of “web” around your seeds or greens. (The “shells” of the seems may be opened or cracked as if it began to germinate, but no foliage sprouted.)
- The seeds themselves may be clumped together inside the web of mold.
- The seeds may appear discolored.
One thing to keep in mind is that mold can quickly spread across your entire batch of microgreens. It does not remain attached to one plant as the root hairs will. Look around in your trays or other containers and note whether the growth has spread across the crop. If the fibers are restricted to individual plants, there’s a strong chance that you’re mistaking the roots for mold. If not, you’ll need to take further action.
In germinated plants, mold infections look quite different. While you might still notice the thin mold web in the soil, the plants may also have a “mushy” tan spotting on the foliage. This is a clear sign that your plants are suffering from fungal infection. Remember that mold growth may appear slightly different depending on the cause and type of microgreen; however, these are general signs you can look for in most plants. (Source: University of Minnesota Extension)
What Types of Mold Affect Microgreens?
“Mold” can be several different types of fungus that affect the health of your microgreens (depending on the species, these microorganisms can affect you, too!).
Though growers most often encounter white mold, it can also be (Source: Web MD):
- Black
- Gray
- Orange
- Tan or brown
- Green
- Purple
Although they can all inflict harm upon your microgreens’ health, various species will have slightly different effects on your plants’ wellbeing.
Some of the most common types of molds and the related consequences of infestations are listed below (Source: Burpee):
- Botrytis species:
How to spot it: More commonly known by the partial misnomer “Gray Mold,” this group of fungi species starts as a white growth and gains pigment over time, eventually developing black structures on the infected plant. You’ll know it’s a Botrytis infection upon observing these critical signs:
- The plant tissue appears “wounded.”
- There is an excess of injured or falling leaves.
- Stems may be broken or injured as well.
- The foliage is damaged unusually easily by regular maintenance activities such as watering.
What happens to your plant? Since this mold spreads by windblown spores, Botrytis infections must be dealt with as soon as possible. Otherwise, they will quickly get out of hand. At first, the fungus steals nutrients that may leak from the injured plant. It then invades the plant’s healthy tissue and begins to leech more nutrients until the plant dies.
(Source: PennState Extension)
- Sclerotinia species (most often, Sclerotinia sclerotiorum):
How to spot it: These fungi create the infamous “cobweb” appearance as their mycelia (the network of thin, white fibers) spread across the affected plants. This web of mold will appear dense, almost as if a web of cotton was sewn across the microgreens. Instead of thriving on the plant, this fungus develops hard, black seed-like structures known as “sclerotia.” These allow the mold to persist in the soil for several years.
What happens to your plant? The fungus invades the plant’s tissues and creates lesions (usually, these will appear as any shade of brown). It then causes rotting in the stem, ultimately killing the plant.
(Sources: University of California, Agriculture, and Natural Resources; United States Department of Agriculture)
- Rhizoctonia, Fusarium, and Pythium species:
How to spot it: These are grouped as they are all responsible for “damping off*.” These infections can affect both mature plants and seedlings. You’ll know your microgreens are suffering from damping off when you observe the following signs:
- The seeds do not germinate.
- The first foliage is mushy and discolored (gray or brown).
- The leaves are wilted.
- The roots are stunted or have sunken spots.
- The white “cobweb” is spreading through the microgreens.
What happens to your plant? Older plants may be able to resist the negative impacts of damping-off since they have a more developed root system, but it’s not guaranteed. The disease causes stems to become thin and excessively filled with water. The foliage falls off as well, eliminating the plants’ ability to produce and transfer energy. This ultimately kills the plant.
(Source: University of Minnesota Extension)
*Damping-off is a disease that primarily affects seedlings. (Older plants that are affected by these fungi are far more likely to survive.) Just like most other fungi, the pathogens that cause damping-off can be easily transferred between containers, so you must be diligent when caring for your plants.
Mold spores can be transferred in any of the following ways:
- Gardening equipment may be contaminated and spread the spores or pathogens to previously healthy containers.
- Wind or insects may distribute the spores to other containers.
- You might forget to wash your hands after caring for an infected container and potentially spread the disease to healthy plants.
Be mindful of how you care for your plants to ensure that they all remain as healthy as possible, even if you have identified a mold infection.
Why Does Mold Grow on Microgreens?
Fungi are attracted to numerous environmental aspects that can either occur on their own or interplay with other factors to create the perfect habitat for mold growth. First, as you might assume, moisture plays a significant role in a planter’s vulnerability to fungal infection. Whether it’s on your microgreens or in the walls of the building containing your trays, mold needs moisture to establish itself and thrive. (Source: Environmental Protection Agency)
Second, mold, like all living organisms, requires a source of nutrients to develop. Unfortunately, your microgreens offer just that, and the fungal species responsible for these infections are latching onto it. This leeching of nutrients starts in the soil. As you know, your plants derive most of their nutrients from the medium they’re planted in, especially when given boosts from compost and fertilizer.
The invasive fungus will thrive off these minerals first, taking the time to grow to maturity. By the time they’ve leeched the necessary nutrition from the soil, the mold is strong enough to move onto the plant and steal directly from its cells.
One of the worst parts about this is that mold can thrive on nearly any organic medium (even though the species discussed here favor plant material). So, even when your plants have nothing left to give, or even after you’ve cleaned out the tray of affected plants, the mold may still survive, waiting to infect the new microgreens you plant.
How Temperature May Influence the Likelihood of Mold Growth
It’s a bit tricky to blame mold growth on temperature since this specific factor can differ between fungal species. For example, the Botrytis species has quite a wide temperature range in which it can grow. At the beginning of its life, it can grow in conditions anywhere from 55-75֯F. As it matures, however, the preferred temperature rises just slightly to 60-75֯F. (Source: University of Massachusetts Amherst)
So, you might attempt to protect your plants using temperature-focused measures, yet, to defend against Botrytis, you’d either have to freeze or bake your plants, essentially. Further, attempting to treat the soil separate from the plants may prove to be pointless. This is because the fungus’ “chlamydospores” and “microsclerotia” (structures that allow the fungus to spread and reproduce) can survive for extended periods without optimal conditions.
Sclerotinia sclerotiorum has an even wider temperature range in which it can grow. This fungal species can survive anywhere from 41-77֯F. One of the only factors influenced by this temperature range is the fungus’ ability to create reproductive structures, yet, this does not necessarily take away from its ability to harm your microgreens. (Source: Springer Link)
Experts suggest that you heat the soil to prevent fatal infections, but this must be done in combination with many other steps to achieve the desired effect. Fungal species for which there is a specific temperature range for prevention include those that cause damping-off – Rhizoctinia, Fusarium, and Pythium. It’s advised that you get the soil to between 65-70֯F before planting to keep your microgreens safe. (Source: University of California Agriculture & Natural Resources)
How to Get Rid of Mold on Microgreens
Luckily, there are numerous methods you can use to rid your microgreen crops of threatening mold growth. Depending on the mold species that has infected your plants and the extent of its growth, you may need to adapt your approach or combine multiple techniques to manage, and ultimately, eliminate the infection.
Getting Rid of Botrytis Mold
For the Botrytis species described above, you can use the following management guide to both prevent fungal infections and nurse your microgreens back to health:
- Sanitize the area: Decaying or dying plant material is a major attractant to mold and other pathogens. Getting rid of it is one of the best things you can do to prevent future mold growth and treat any current infections.
- Note: Don’t leave the waste in the same room as the microgreens. Throwing the old plant material away in the same location where your microgreens are housed is a recipe for disaster. Why? Botrytis fungi reproduce by releasing upwards of 60,000 spores into a site on the plant that is no longer than the tip of your finger. Improper disposal of the decaying plant matter invites these spores to return and put your microgreens right back into a compromised state of health.
- Maintain appropriate ventilation: Many different types of fungi are highly attracted to humid environments, as mentioned above. Proper ventilation will keep the greenhouse or other storage and growth units suitable for your microgreens, so they do not fall victim to fatal fungal infections. A few different ways to ventilate a greenhouse are (Source: University of Massachusetts Amherst):
- Natural ventilation: Many growers have capitalized on greenhouse designs with roll-up sides. This allows you to exert the utmost control over just how much airflow you want to go through your greenhouse. However, it is critical to note that you’ll only reap the effects of this ventilation method if you place your greenhouse in an open area. Otherwise, you are only inviting stagnant air into the microgreens’ housing structure.
- Note: Remember that warm air can enhance the effects of ventilation. The taller your greenhouse, the better chance you’ll reap the benefits of warm air. This is because the air’s moisture will rise along with the heat, helping to cool the plants down and keep them relatively dry.
- Ventilation using fans: Using fans to move air throughout your greenhouse or other growing location can boost your ventilation efforts’ effectiveness. There is a suction effect caused by removing the heated air, serving to pull in the cold air through all possible entryways into the building.
- Note: Fan-assisted ventilation can only be effective when the component is appropriately-sized. According to the University of Massachusetts Amherst, the fan should be capable of producing “one volume air exchange per minute” for spaces about 8ft in height, specifically during the summer. Placing your fan in the appropriate location in the building is essential to a positive performance as well.
- Evaporative ventilation: Fans do not always do the trick on their own, especially during bouts of high heat. Using the heated air to your advantage, you can cool the building where your microgreens are housed by 10-20֯F. Placing wet pads throughout the greenhouse or another structure and allowing the fans to pull the cold air from them is perfect for cooling your microgreen growing space.
- Note: This technique works best when the humidity is low outside. This way, the moisture from the pads doesn’t remain stagnant in the growing area and can exit to the outside environment instead.
- Natural ventilation: Many growers have capitalized on greenhouse designs with roll-up sides. This allows you to exert the utmost control over just how much airflow you want to go through your greenhouse. However, it is critical to note that you’ll only reap the effects of this ventilation method if you place your greenhouse in an open area. Otherwise, you are only inviting stagnant air into the microgreens’ housing structure.
- Do your best to avoid injuring your plants: Recall that many fungal species are attracted to broken microgreens because broken stems or detached leaves leak nutrient-filled fluid. This fluid is enough to power up the fungus just enough so it can overtake your poor plants. Being careful when transferring plants and pruning will prevent you from accidentally endangering your crops.
Preventing and Eliminating Sclerotinia Fungus
Management techniques for Sclerotinia sclerotiorum slightly differ from Botrytis. To care for microgreens infected by this fungus, you’ll need to use a combination of preventative and mechanical measures and fungicides:
- One of the most important things for you to keep in mind regarding this type of mold is that it can survive in the soil for extended periods. Of course, some of its relatives may survive for either shorter or longer timeframes, but the point still stands. Never reuse the soil from infected planters!
- Using drip irrigation can reduce the potential for excess moisture and humidity to accumulate at the soil’s surface, eliminating the optimal environmental conditions for this particular fungus family to take over. (Source: National Library of Medicine)
- Rotating your microgreen crops is essential to maintaining your plants’ health, especially in defense against Sclerotinia infections. Lettuces are particularly vulnerable to this fungal type, so as soon as your lettuce microgreens are ready to sell, rotate these plants with another kind right away. Exclusively growing lettuce in one specific container or growing area can increase your chances of the fungus coming back and establishing itself, even after eradication.
- This fungus can be tricky to eliminate, and mechanical prevention methods such as those listed above do not always work thoroughly enough. If you don’t get the desired results after following the previous steps, then it’s time to pull out the big guns and apply some fungicide.
- The most effective fungicides against Sclerotinia infections are (Note: Depending on the severity of the infection, these may vary in their effectiveness; Source: National Library of Medicine):
- Vinclozolin (most effective). Common product names include (Source: Extension Toxicology Network):
- BAS 352F
- Drive
- Ornalin
- Ronilan
- Vorlan
- Benomyl. Common product names include (Source: Extension Toxicology Network):
- Agrodit
- Benex
- Benlate
- Benosan
- Fundazol
- Tebuconazole. Common product names include (Source: Michigan State University):
- Elite
- Tebustar
- Orius
- Thiophanate methyl. Common product names include (Source: Michigan State University; Farmers Business Network):
- Topsin M
- Incognito 4.5 F
- Cercobin Fungicide
- Fungo Flo
- Nufarm T-Methyl variations
- Vinclozolin (most effective). Common product names include (Source: Extension Toxicology Network):
- The most effective fungicides against Sclerotinia infections are (Note: Depending on the severity of the infection, these may vary in their effectiveness; Source: National Library of Medicine):
Dealing with “Damping Off” Mold Species
Rhizoctonia, Fusarium, and Pythium species are some of the most prominent mold species that cause the fatal condition known as “damping off.” To prevent and manage this condition, follow the steps listed here:
- Before transplanting your microgreens, sterilize all containers you intend to plant them in. The spores of these mold species can stick around for extended periods and may linger on the container’s surfaces unless they are washed off. Experts at the University of Minnesota Extension recommend soaking your planters in a 10% bleach solution for 30 minutes to get them ready for planting.
- Again, never reuse soil! The pathogens can remain in the soil and wreak havoc on yet another round of microgreens, even after you’ve eliminated the problem from one crop. The best way to protect your plants, especially if you’ve dealt with infections in the past, is to use brand-new soil with each rotation.
- Note: Only use potting soil that allows for healthy drainage. Soil that is too compact will hold far too much water and create the dampness that is highly attractive to fungi.
- Suppose there is a need to use the same tools between containers (such as when you’re pruning or planting en masse), clean all the appliances before moving onto the next container. Neglecting to do so increases the chance that you will spread the infection throughout your entire stock. Spores can stick to your shears and other gardening apparatuses and can easily travel between containers as if they are hitching a ride from location to location. Remove them to keep your plants safe (even if you don’t believe your microgreens are infected)!
- Younger microgreens are more vulnerable to damping off, so you’ll need to do everything in your power to usher them into their older age than you usually would, especially if you suspect an impending infection. These two steps are central to giving your little microgreens the best shot at a healthy growth rate:
- It’s best to water your young microgreens with warm water, as the use of cold water is a surefire way to slow their growth and raise their risk of fatal infection.
- Provide ample light (between 12-16 hours of either sunshine or artificial light) to hurry them along in the growing process as well.
Soil Treatment Options for Mold Prevention
Remember that you can treat the soil separately to prevent mold growth in your microgreens. Disease-causing pathogens like fungus could be present in packaged soil, so if you’re worried about your microgreens’ health, follow some of the tips below to maximize the safety of your plants (Source: Washington State University Cooperative Extension):
- Place your soil in an oven-safe container and heat it for about 30 minutes at 140֯F. It should be no more than 4 inches deep. This temperature is suitable to kill most disease-causing fungi. This treatment method is a double-edged sword, unfortunately. The higher the temperature you use to treat the soil, the greater the chances that you’ll accidentally kill beneficial microorganisms present in the soil.
- Note: If you are concerned about any other pathogens, such as viruses and bacteria, you can increase the temperature to 160-180֯F. Never exceed these suggestions, as reaching 212֯F, for example, can trigger the production of toxins that will kill your microgreens.
- You can also treat your soil by steaming. Do this by placing 4 inches or less of your soil mixture (loosely packed) in a shallow container. Set it inside a kettle or similar container on a rack to prevent direct contact with the water. Pour about an inch of water into the kettle, avoiding the soil. Cover the container with foil and bring the water to a boil, ideally to 155֯F. Turn off the heat, and wait for the temperature to rise to 160֯F to start a 30-minute countdown.
Both these methods are reliable ways by which you can protect the health of your microgreens, starting with the soil first. Remember that there is no need to believe that all potting soil is out to get your plants. However, there are times where these treatments may be necessary. Weigh the potential risk of killing beneficial microorganisms against the need for heat treatments before you commit to these methods.
In Conclusion
Many different types of fungal species can harm your microgreens. These fungi are primarily attracted to humidity and excess nutrients leached from the soil or damaged plants. Temperature isn’t a significant factor in what attracts these molds, as they can survive in a wide range of environmental conditions, both warm and cold.
The best ways to protect your microgreens from these infections include sanitizing growing areas and containers, ventilating the nursery, cleaning gardening tools between uses, and using drip irrigation. You can also treat your soil ahead of planting to remove any unwanted microorganisms.
Source:
https://extension.umn.edu/solve-problem/how-prevent-seedling-damping
https://www.webmd.com/women/qa/what-is-mold
https://extension.psu.edu/botrytis-or-gray-mold
https://anrcatalog.ucanr.edu/pdf/8042.pdf
https://www.gipsa.usda.gov/vri/sclerotinia.aspx
https://extension.umn.edu/solve-problem/how-prevent-seedling-damping
https://ag.umass.edu/greenhouse-floriculture/fact-sheets/botrytis-blight-of-greenhouse-crops
https://link.springer.com/article/10.1007/BF03052312
https://ag.umass.edu/greenhouse-floriculture/fact-sheets/ventilation-for-greenhouses
https://pubmed.ncbi.nlm.nih.gov/18944972/
https://pubmed.ncbi.nlm.nih.gov/30822994/
http://pmep.cce.cornell.edu/profiles/extoxnet/24d-captan/benomyl-ext.html
https://www.canr.msu.edu/news/generic_fungicide_options
https://www.fbn.com/direct/ingredient/thiophanate-methyl